How high to hang your grow light over your plants
This guide will help you understand how high to hang your grow light for maximum photosynthesis and healthy growth. Whatever your chosen lighting system the principal is the same:
Hang your grow light close to the plants so they receive as much light as possible.
The higher the grow light is above the plants the more light will overshoot the plant canopy and reflect off the grow tent or grow room walls. Not all this light is reflected back due to reflectance losses so some light energy is wasted as heat.
The trick is ensuring the grow light is not too low as to cause plant damage directly under the light fixture, where the light and heat are most intense.
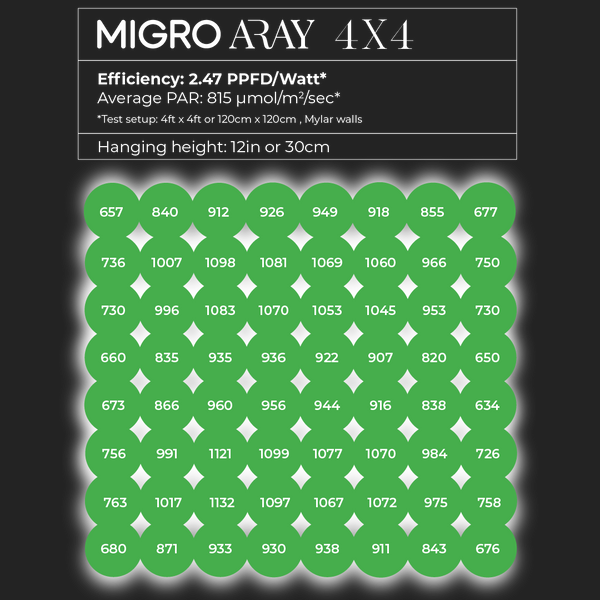
Grow light manufacturers should recommend optimum hanging height and provide a PAR map
The LED grow light manufacturer is best placed to provide information on the optimum hanging height in the specified grow space. A PAR map is a visual aid displaying the PAR intensity measured by a PAR meter (quantum sensor) in a grid across a plane representing the plant canopy.
You can see the PAR intensity measurements across the specified grow area and observe the maximum and minimum PAR intensity and how even the distribution is.
Recommended LED bar grow light distance from plants
If a PAR map is not available for your grow light fixture we can guide you on the best hanging height for an LED bar grow light.
LED grow lights are large in physical size and their format spreads light wide and allows a relatively low hanging height. Also LEDs do not emit Infra red or heat radiation, as HPS grow lights do, so you can position LED grow lights closer to plants.

If the distance from the LED grow light to the plants is relatively short more light will reach the plant canopy but the spread will be less uniform. The plants in the centre will receive much higher PAR intensity than the plants at the edges.
Increasing LED grow light hanging height increases the PAR intensity at the edges and improves uniformity but the total amount of PAR reaching the plant canopy.
If you want the compromise between the two use a medium LED grow light hanging distance of about 15" or 38cm.
Recommended hanging height for HID grow lights (Metal Halide and High Pressure Sodium grow lights)
HID bulbs emit a lot of Infra Red radiation which is heat. This means you cannot hang HPS grow lights as close to the plant canopy as you can with LED fixtures because the tops of the plants will be damaged by the radiated heat

HID grow lights with large reflectors can be positioned closer to the plants than smaller reflectors. This is because small reflectors don't spread the light as well and there is a higher risk of hot spots underneath.
High wattage High Pressure Sodium grow lights in the 1,000 watt range should also be hung in the higher over the plants than 600 watt and lower HPS grow lights.
Considering these factors the following is the range of hanging height for HID grow lights.

For lower wattage HID grow lights of 600 watts and smaller with large reflectors we recommend a hanging height of 16" or 40cm.
For lower wattage HID grow lights of 600 watts and smaller with small reflectors we recommend a hanging height of 20" or 50cm.
For large wattage HID lights of 1,000 watts with medium to large reflectors we recommend a hanging height of 24" or 60cm.
Using PAR or Lux meters to optimise grow light hanging height
There are two factors to consider when ensuring the plants are not damaged by hanging the grow light too low:
- Light intensity (PAR intensity)
- Leaf temperature
If the light intensity is too high or the temperature of the leaves gets too high the plants will be damaged. The difficult part is how to tell when the PAR intensity or leaf temperature is at the limit without damaging the plants in the process.
How much PAR light is too much for my plants?

Typically medical herb growers will target an average PAR level (PPFD) across their plant canopy of 800 µmols/m²/sec. However PAR intensity under a single grow light will be higher directly underneath and reduce as you move away to the edges of the grow area.
PAR levels above 1,200 µmols/m²/sec are likely to stress the plants and result in bleaching of the leaves and buds. This damage will kill off healthy bud growth and leave the plant susceptible to disease. For this reason a good rule of thumb is to lower your grow light until you measure a maximum of 1,200 µmols/m²/sec at the top of the canopy.
The simplest and most accurate way to detect the PAR intensity (PPFD) level on the plant canopy is to use a PAR meter or Quantum Sensor. This is an instrument that is calibrated to measure the light level in PAR for horticultural applications (not a Lux meter for measuring lumens for humans).

We use an Apogee PQ-610 ePAR meter in our tests and it is a highly accurate PAR sensor. If you are a committed grower I would highly recommend the investment as you will benefit hugely from the improved knowledge and resulting yields
Using a Lux meter to read PAR intensity to adjust grow light hanging height

However you can also use a Lux meter for LED grow lights and apply a conversion factor to the lux reading to convert to an approximate PAR reading.
We have a guide on this hack here: Lux meter to PAR meter hack
If you have an iPhone you can also use this PAR app which has been reviewed here: Par APP test and comparison videoWhere do I measure the maximum PAR under my grow light?
The closer you are to the grow light the higher the PAR intensity will be. The shortest distance from the grow light to a flat plant canopy is directly underneath. That is the point on the canopy where the PAR intensity will be greatest. As you move to the side of the plant canopy the distance from the grow light increases and the PAR intensity reduces.
If you lower the light until the centre point is at the maximum PAR intensity then the rest of the canopy is going to be receiving reduced and therefore safe levels of PAR light
How can I adjust for maximum PAR if I don't have a PAR meter?

The other method of determining the lowest possible distance the grow light can be from the plants is to use leaf temperature as a guide. The best way to do this is to use a infra red thermometer.
Use a Infra Red Thermometer to measure leaf temperature
The leaves respire or 'sweat' and should lose their surface heat faster than it is absorbed from the grow light. If the leaf receives too much heat it will not be able to evaporate the heat away and the leaf will curl up, brown and die. If the leaf is not receiving too much heat the leaf temperature will be below the room temperature around it. For example, if the temperature of the environment is 25 Degrees Celcius the leaf temperature should be 23 - 25 Degrees.
Lower the grow light to where you think it is suitable and, after a few minutes, test the leaf temperature. If the temperature is below the surrounding air temperature then lower the light a little. Test again until the leaf temperature is the same as the surroundings. Raise it a few centimeters above this height and this should be the optimum hanging distance. As the plants grow adjust the height up regularly to avoid damage to the upper parts of the canopy.

Detect the temperature using the back of your arm with HID grow lights
Put your forearm, underside up, underneath the grow light and test at what height your skin becomes uncomfortably warm. This will be approximately the minimum distance you should have to the top of the canopy. Add a few centimeters to the distance and adjust the height of the grow light above the canopy by this much. Check a few hours later to see if there is any leaf curling or bleaching. If there are signs of damage, such as leaf curling, raise a few centimeters until you find a height that is suitable and maintain this distance as the plants grow.
Adjust your grow light hanging height by trial and error
Set the distance from the underside of the light to the top of the canopy of about 60 centimeters. Check a few hours later to see if there is any leaf curling or bleaching. If there are no signs of damage lower the grow light five centimeters, leave for a while and check for damage again. Repeat until you detect signs of heat damage. This will be approximately the minimum distance you should have to the top of the canopy. Add a few centimeters to this distance and adjust the height of the grow light above the canopy accordingly. Maintain this distance as the plants grow.
Maintain the optimum grow light distance throughout the grow
Once you have established the optimum hanging height for your grow light system it is essential you constantly raise the light as the top of the canopy gets higher.
If you are using a net it is easier to manage grow light height. You can tuck pieces of plant that stick up through the net back underneath and have a fairly flat and static canopy. This means you will have less adjustment of the grow light height to make.
If you are not using a net the top of the canopy will be irregular in height. You will have to adjust to suit the tallest parts of the plants. Alternatively you can arrange the plants in a 'stadium shape'. This means putting the taller plants around the edges of the grow light coverage and the smaller plants directly underneath. This will compensate for the higher light intensity of the light in the centre of the grow and lower intensity at the edges.


2 thoughts on “Complete guide for grow light distance from plants for Maximum Yield”
Jadie Ratliff
After reading this article I still don’t understand what the top of canopy is. What’s my idea of top of canopy my guess would be maybe the top of the plant
Donald E Harris
This is a great and working read. Thanks